
Installing SPC (Stone Plastic Composite) flooring is a straightforward process, but it requires some preparation and the right tools to ensure a perfect finish. Whether you’re tackling a DIY project or hiring a professional, here’s a step-by-step guide to help you install SPC flooring like a pro.
What You’ll Need:
- Tools: Utility knife, tape measure, pencil, tri-square, pull bar, soft-faced or rubber mallet, tapping block, and 6 to 8 millimeter flooring wedge spacers.
- Materials: SPC flooring planks, underlayment (not required, as SPC floors come pre-attached with a 1mm underlayment), and edging strips (for covering expansion gaps).
Step 1: Preparation
Before starting the installation, ensure that the subfloor is clean, dry, and level. SPC floors are designed to be installed directly over a firm, even, and dry subfloor. Important Tips:- Acclimate the flooring: Lay your SPC planks in the room where they will be installed for at least 24 hours. This allows the planks to adjust to the room’s temperature and humidity levels.
- Extra Material: Purchase 10% more material than the size of the room to ensure you have enough for the installation.
Step 2: Plan the Layout
- First and Last Rows: Measure the room’s length and divide it by the width of the planks. Consider the wedge spacer gaps around the room. The last row should be cut to ensure both the first and last rows have a minimum width of 5 centimeters.
- For the first row’s length, ensure the planks are at least 20 centimeters long. If not, trim the first plank so that both the first and last planks are at least 20 centimeters.
Step 3: Cutting the Planks
Use a utility knife and a straightedge to cut the planks to the correct length. When cutting, make sure to score the plank along the desired line. After scoring, back cut the underlayment on the bottom of the plank and break it along the score line.Step 4: Install the Flooring
- Start with the First Row: Place the first plank in the top-left corner with the tongue side facing the wall. Lay the first row of planks from left to right.
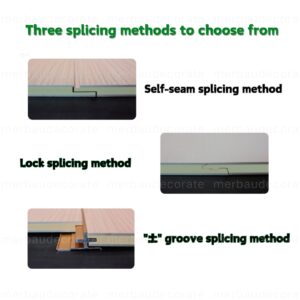
- Lock the Planks Together: Hold the tongue and groove of the new plank at a slight angle to the plank you’re connecting it to, and click it in. Ensure there are no gaps between the planks and that they are completely flat on the ground.
- Cut the Last Plank: To cut the last plank in the row, turn it so the edge that will be connected to the previous plank is facing the wall. Place the plank over the gap between the previous plank and the wall, mark it, score it, and snap it to size. Ensure the last plank in the row is at least 20 centimeters long.
Step 5: Stagger the Rows
When laying the second row, make sure to stagger the seams between the first and second rows. There should always be at least a 20-centimeter overlap between the short seams from row to row.Step 6: Install Remaining Rows
For each new row, start by clicking the short side first, then lay the long side into the groove of the previous row. Slightly lift the plank, press both sides into the groove, and lower them simultaneously. Tap gently with a tapping block and rubber mallet to close any small gaps.Step 7: Cutting Around Projections
If you need to install the flooring around obstacles, like door frames or pipes, measure the protruding object and mark the necessary dimensions on the plank. Cut the plank to fit, and then snap off the excess.Step 8: Finishing Touches
Once all the planks are installed:- Remove the wedge spacers from the gaps along the walls.
- Install edging strips to cover the expansion gaps.
- Use T-molding or a multi-purpose reducer to create a smooth transition between rooms, especially at doorways.
FAQ:
- Do I need to install an underlayment with SPC flooring?
- No, an underlayment is not required for SPC flooring, as it comes pre-attached with a 1mm thick underlayment. However, in some cases, additional moisture barriers might be recommended for certain subfloors.
- How much extra material should I buy for my room?
- It’s recommended to buy approximately 10% more material than the size of the room to account for any mistakes or future repairs.
- Can I install SPC flooring over tile?
- Yes, SPC flooring can be installed over tile, but make sure the tile is smooth, clean, and level. The planks must be able to lock together properly without gaps.


